Black Carbon Module maintenance
The Clarity Black Carbon Module is designed for low-maintenance operation. It supports long-term continuous sampling of higher concentrations for up to a year, depending on the sampling environment and instrument settings.
The only routine maintenance you'll schedule is replacing the filter tape cartridge every few months. This article covers when the Dashboard tells you a replacement is coming up, and the on-board steps to swap the cartridge in the field.
When does the tape need replacing?
The filter tape cartridges use PTFE filter material to collect a 3 mm sample spot, and advance every couple of days, depending on black carbon concentrations. MAFT-L85 cartridges each contain 85 sampling locations, so a typical tape lasts 3–6 months.
The Clarity Dashboard raises an alarm as the tape runs low so you can plan a timely replacement. You don't have to track consumption yourself — the alarm surfaces automatically against the module's host node.

Finding the tape alarm in the Dashboard
The black-carbon tape alarm is a device (node) alarm, and it lives in the per-device Diagnostics panel, reached from the Devices page. It is not on the AQ Alarms page. (The AQ Alarms page — covered further below — is a separate system for measurement-threshold rules like high PM2.5, and tape alarms do not appear there.)
To find it:
- In the left sidebar, under SENSOR NETWORK, open Devices.
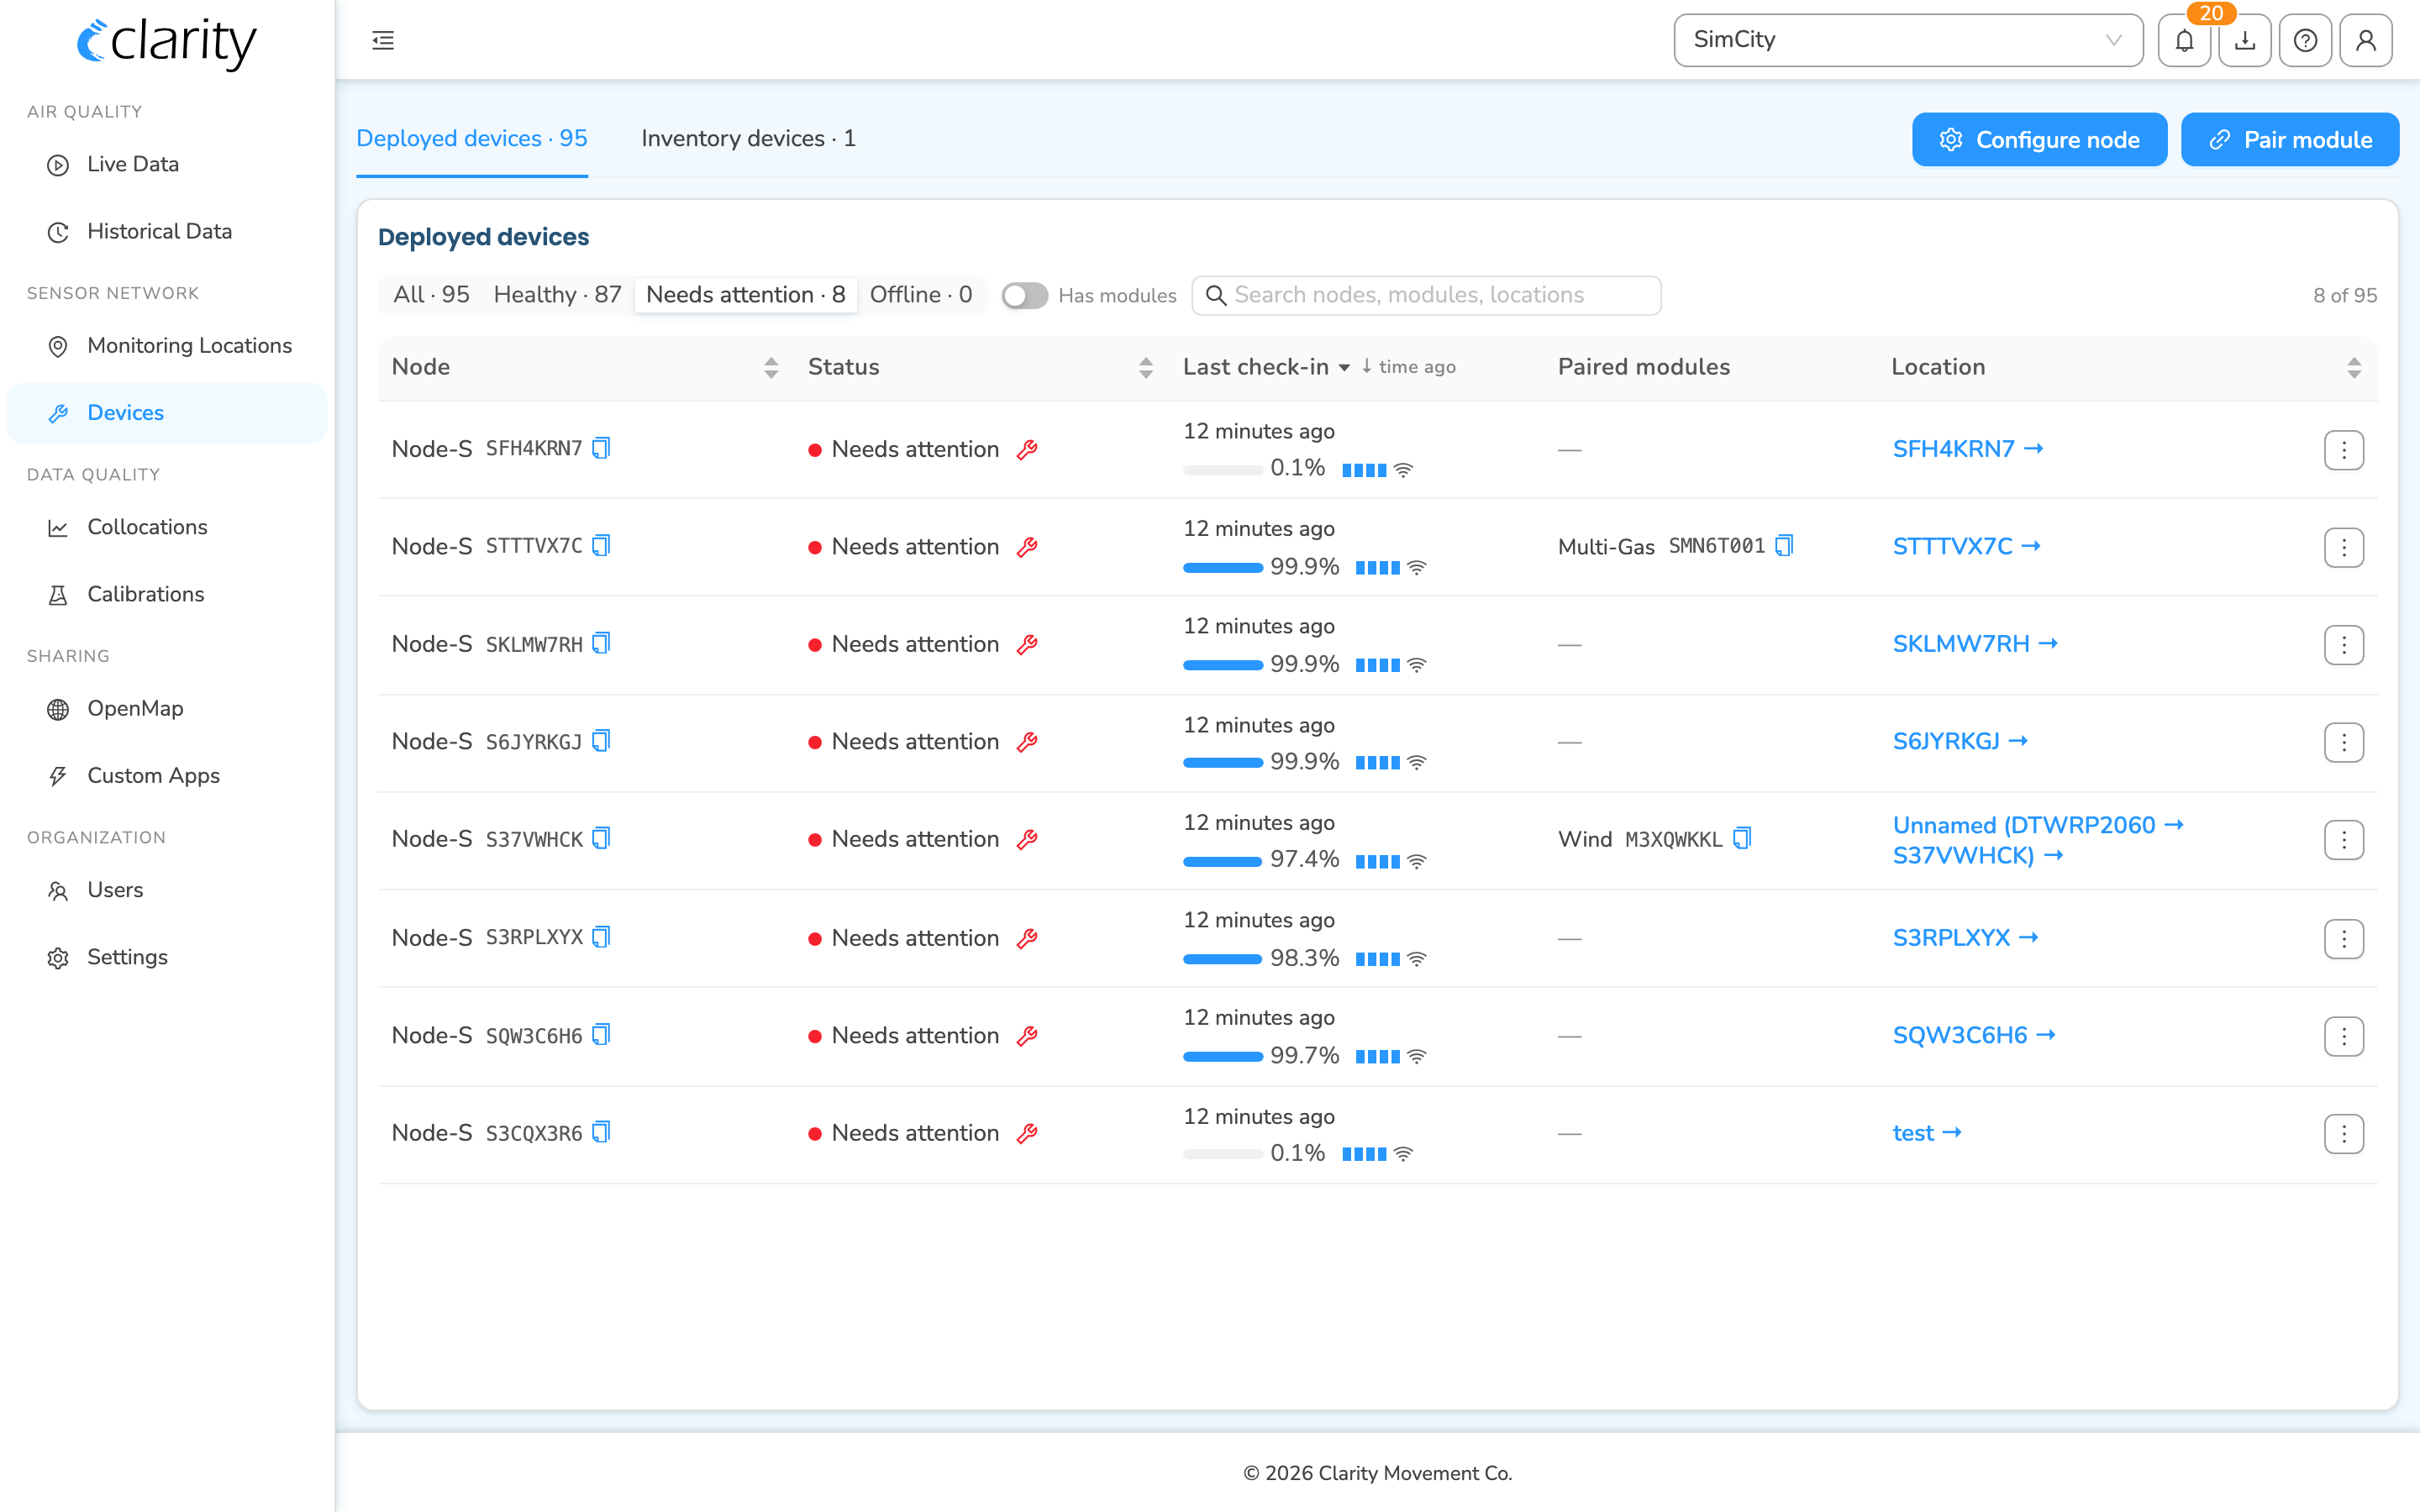
- On the Deployed devices tab, find the node hosting the Black Carbon Module. A node with an active tape alarm shows a red Needs attention health status — you can use the Needs attention filter above the table to narrow the list.
- On that device's row, open the ⋮ row-actions menu and choose Diagnostics.
- In the Diagnostics drawer, scroll to the Alarms section. The active alarms table has Raised at, Last Extended at, Alarm, and Category columns — the tape alarm appears under the Accessory Module category.
- Click the alarm row to expand it for the full description, timestamps, and a Knowledge Base link. The black-carbon tape alarms read:
- Black carbon low tape — "The black carbon accessory tape is running low and may need replacement soon." (your cue to prepare a replacement)
- Black carbon tape at end — "The black carbon accessory tape has reached the end and needs to be replaced."
- Black carbon tape jammed — "The black carbon accessory tape is jammed and cannot advance properly."
- Black carbon tape not clamped — "The black carbon accessory tape is not properly clamped in place."
The AQ Alarms page (a different alarm system)
Don't confuse the device Diagnostics alarms with the AQ Alarms page. AQ Alarms is for measurement-threshold rules you configure (for example, alert when PM2.5 exceeds a value). Open it from the bell icon in the top bar (top right); the popover lists your most recent active AQ alarms and notes that "Alarm rules and history live on the AQ alarms page."
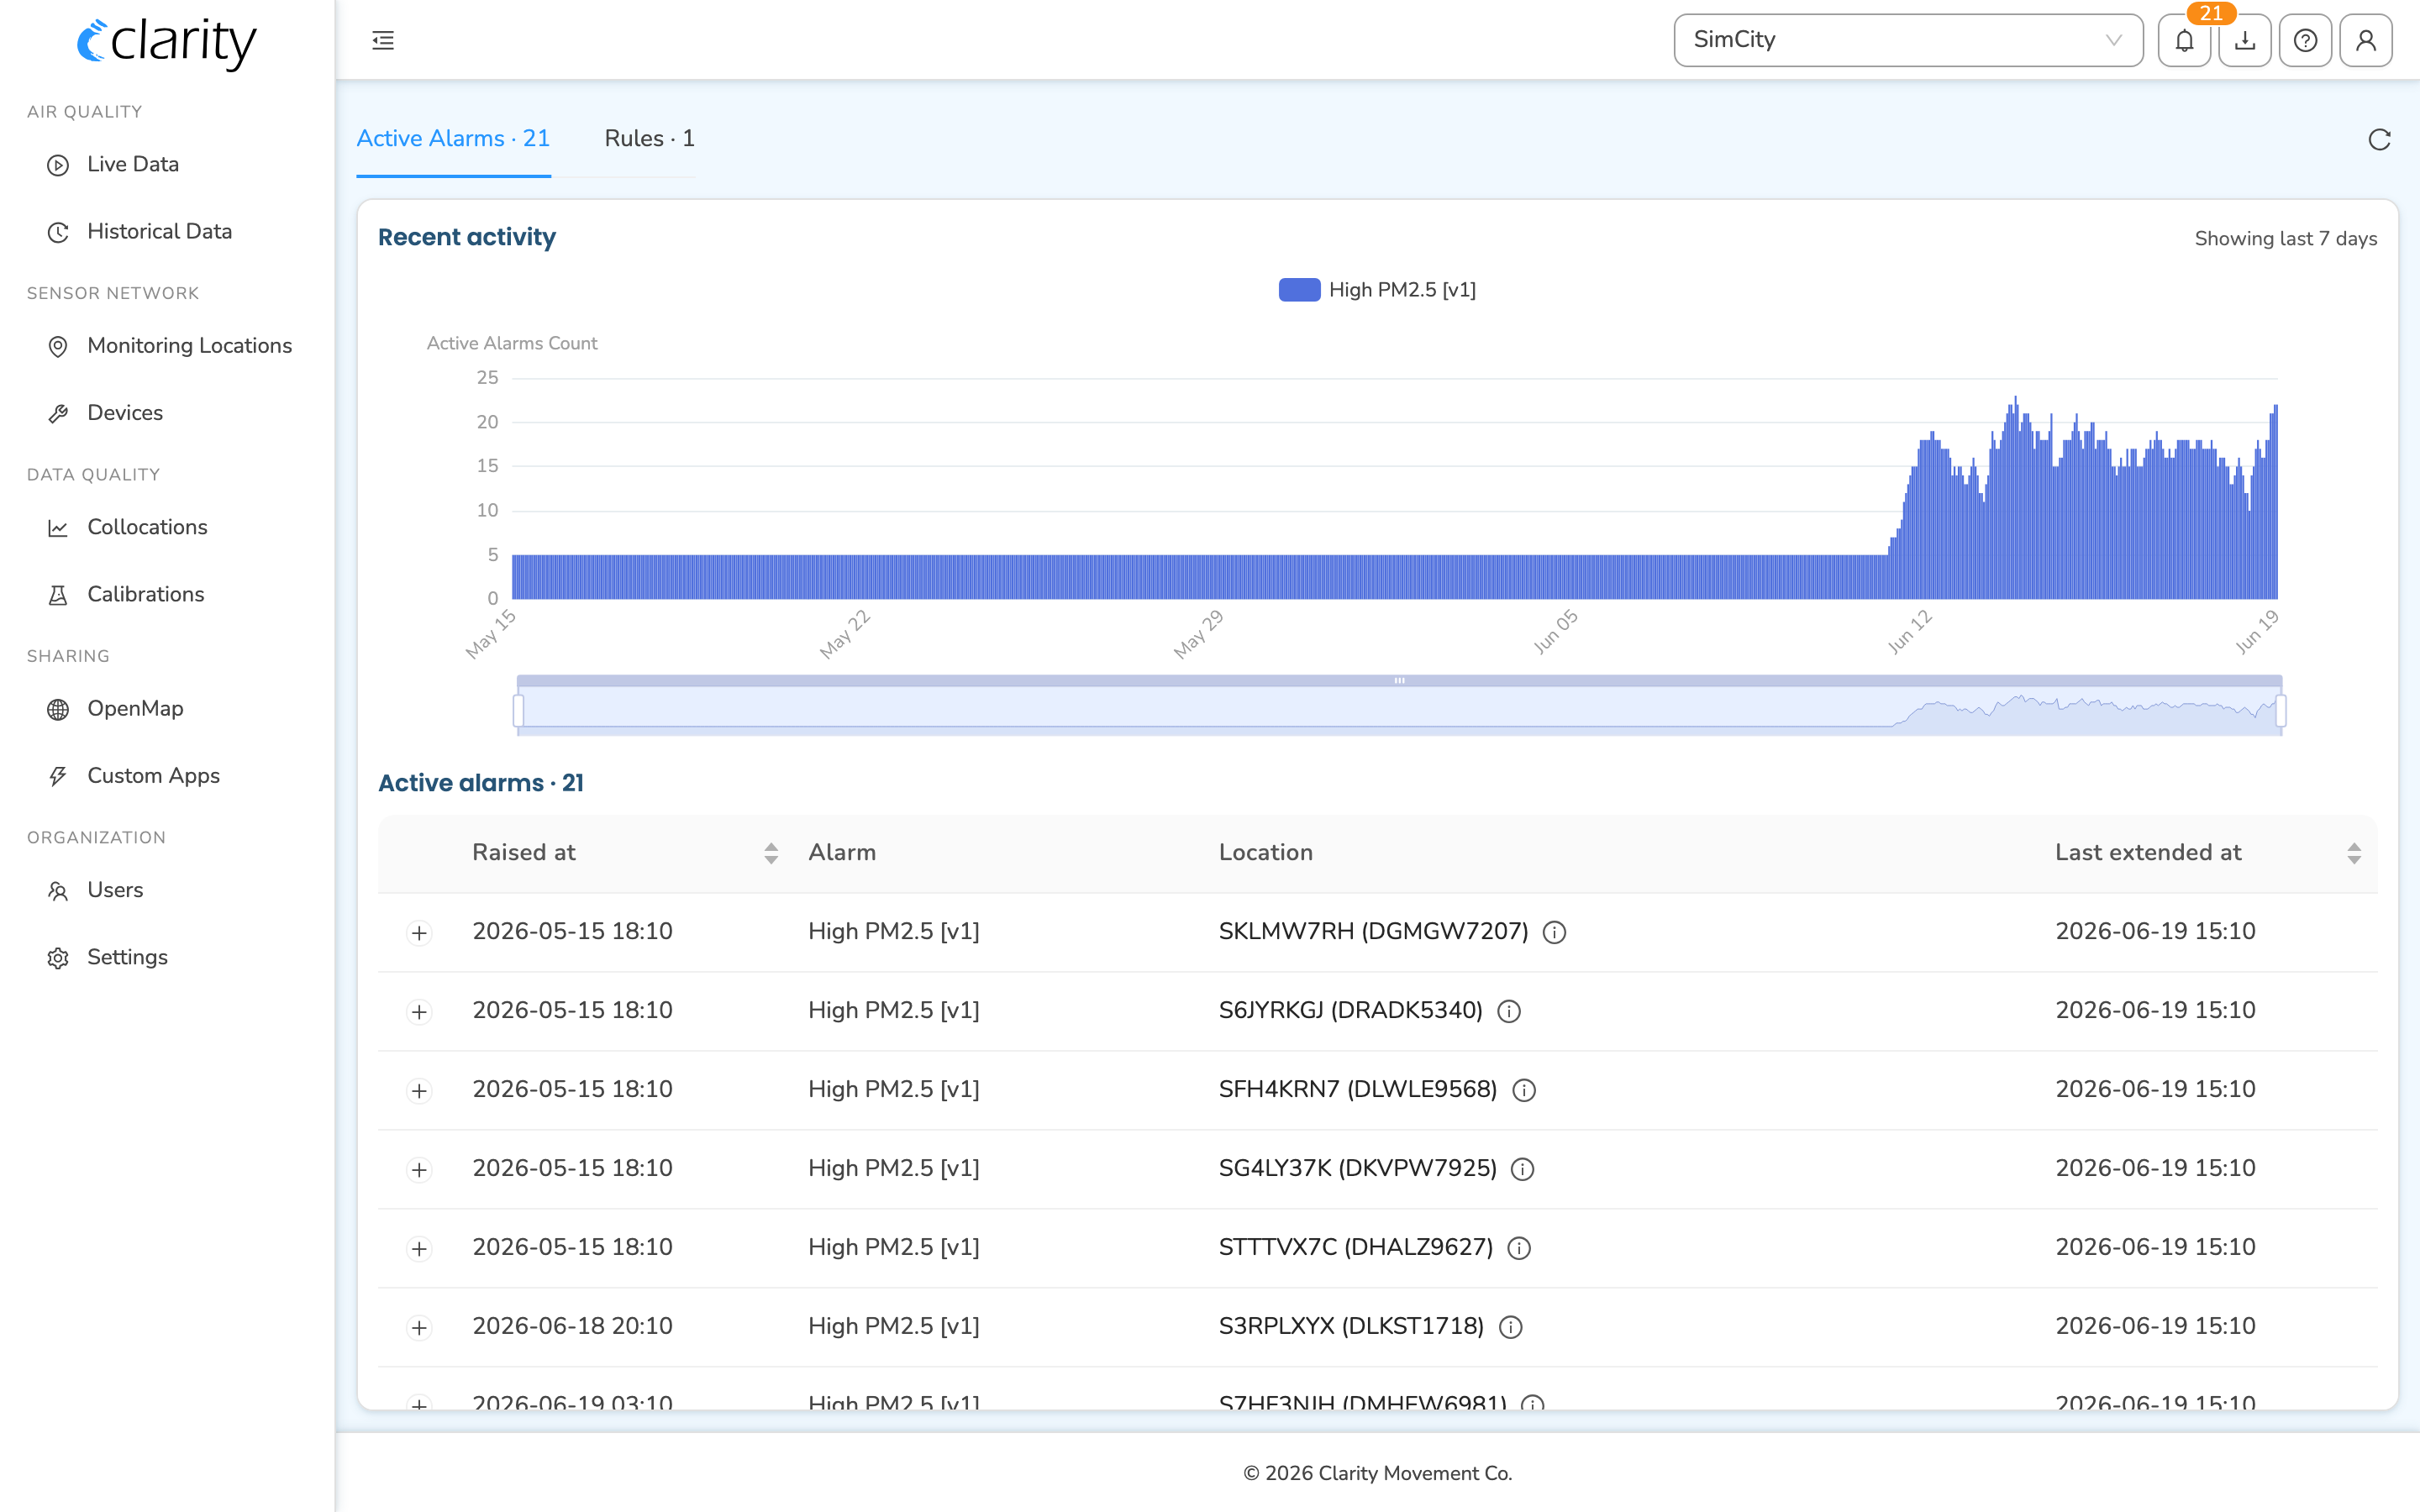
The AQ Alarms page has two tabs — Active Alarms and Rules — with a "Recent activity" chart and full-width Active/Cleared alarm tables. Its columns are Raised at, Alarm, Location, and Last extended at. There is no "Category" column here and no tape/accessory entry — those live in device Diagnostics, as above.
Filter tape cartridge replacement
The on-board user interface on the screen inside the enclosure is used to remove and install the filter tape cartridge. These steps happen on the physical module — the Dashboard's job is just to tell you when it's time.
Tape replacement overview
If you're familiar with the instrument, here's the quick checklist. Detailed steps follow below.
- Unscrew the tape lid using a wide Phillips screwdriver or coin.
- Make sure the Module is powered on through the Node-S.
- Navigate the menu using the left and right buttons to Release Tape and select using the middle button.
- If this tape will be used again, note down the current tape position so you can re-enter it when reinstalling this tape.
- Pull out the tape and place the new tape inside.
- Navigate the menu (one to the right) to Clamp Tape and select. If the tape is new, select the center button. If the tape is old, select the left button and enter the tape position of this tape.
- Tighten the tape lid lightly.
Remove the old filter tape cartridge
⚠️ Important: When removing a filter tape cartridge, record the current sampling position shown on the LCD screen so it can be tracked and re-entered when the tape cartridge is installed again. Do not rewind the filter tape cartridge or reuse previously sampled filter tape sampling locations.
-
Make sure the module is not sampling. If it is, use the on-board interface to stop sampling and measurements by pressing the center button.
-
Unscrew the large flat-head slotted screw(s) in the filter tape cartridge door of the case. When the screw is completely free of its mating threaded hole, use it to pull the filter tape cartridge door from the case. The filter tape cartridge will now be exposed — or, if no cartridge is currently installed, the cartridge holder area will be empty.
-
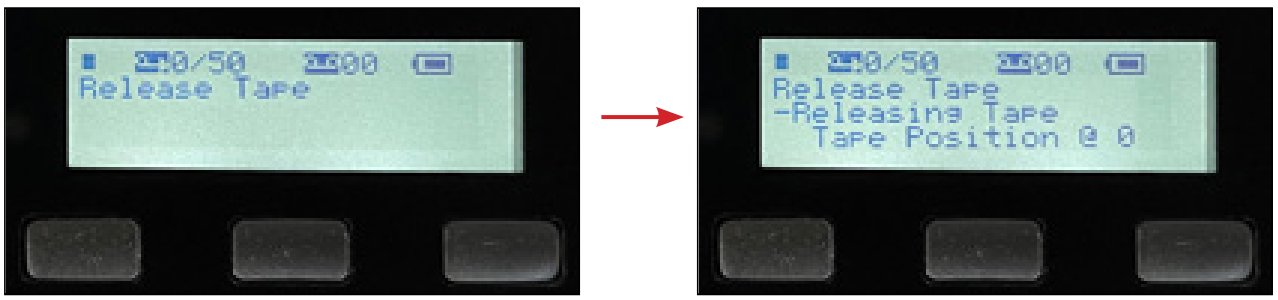
Use the left and right buttons on the on-board user interface to scroll through the top-level menu options and select Release Tape.
-
Press the center button to select Release Tape. The screen displays "-Releasing Tape" and "Tape Position @ " followed by the current tape position value. Record this current tape position value so it can be tracked and re-entered when the cartridge is installed again. The optical head moves to its open position and stops in about 6 seconds.
-
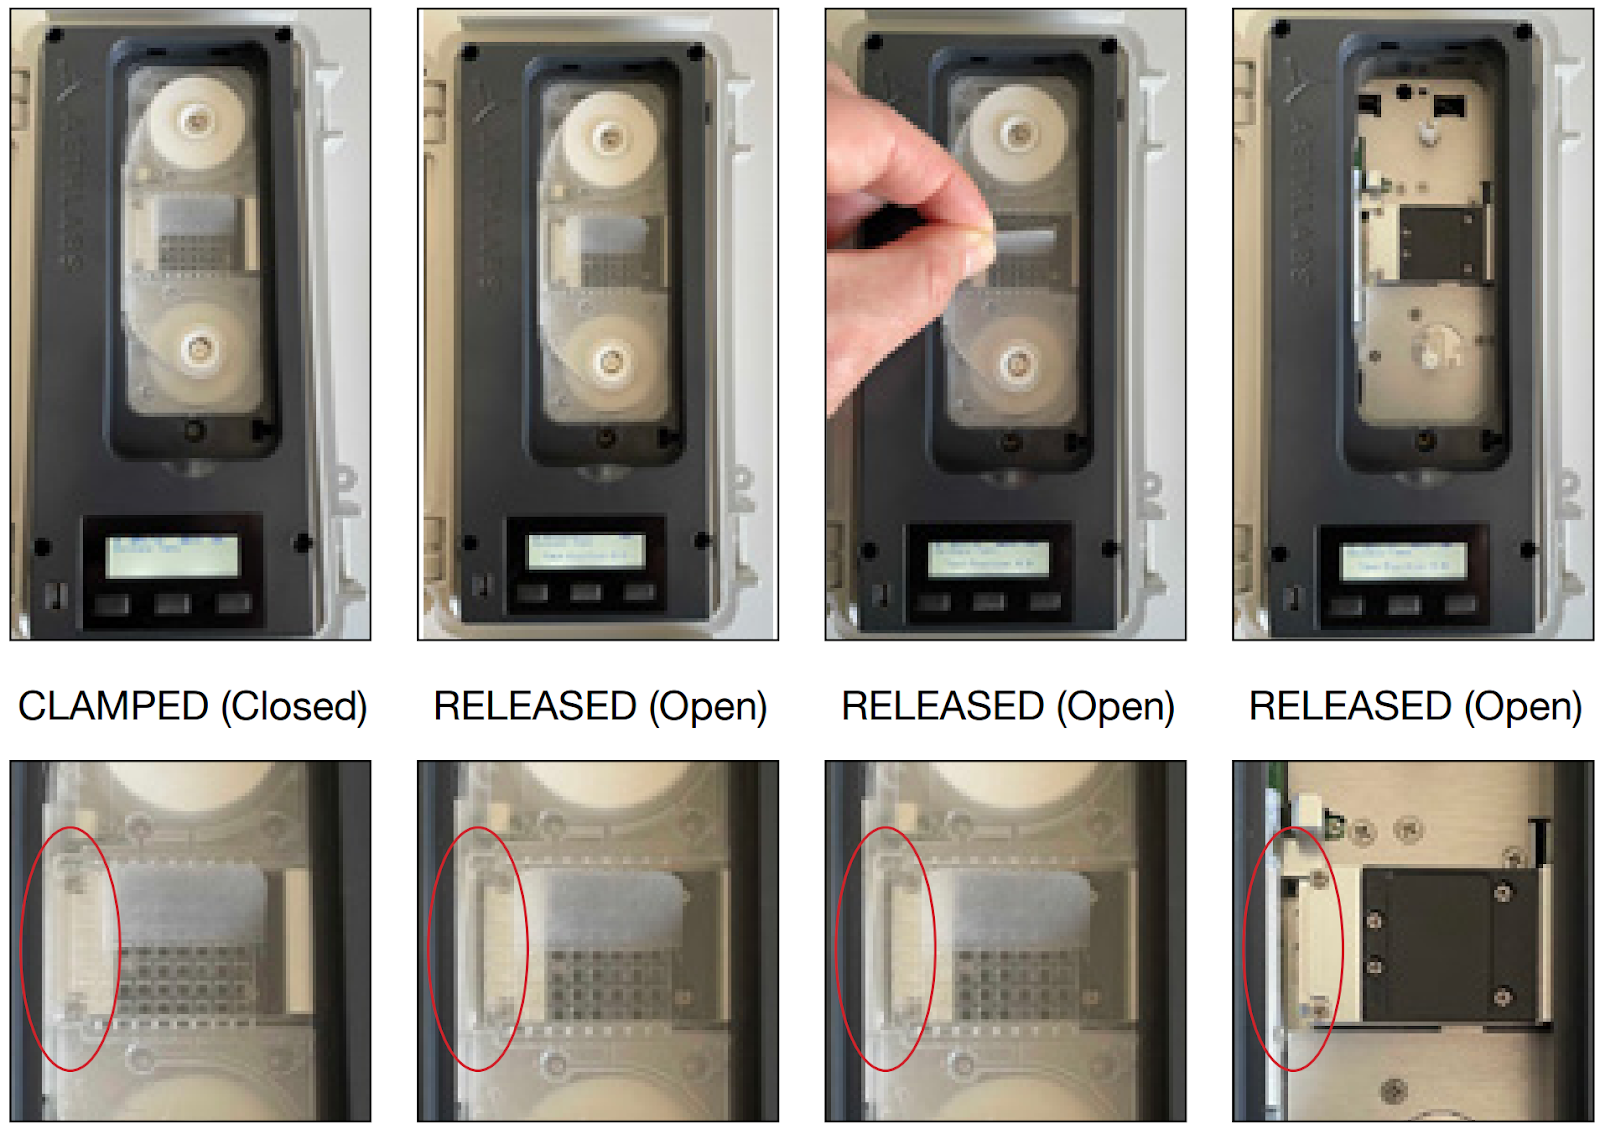
Once the optical head stops moving, use the pull tab in the center of the filter tape cartridge to remove it straight out of the instrument. The optical head is circled in red below.
Install the new filter tape cartridge
-
When inserting a cartridge, make sure the optical head is open and in the released position so the filter can be installed. Use the Release Tape menu to open the optical head if it isn't already.
-
Insert a filter tape cartridge straight into the instrument, aligning the left and right holes in the cartridge with the two white capstans.
-
Make sure the filter tape cartridge is fully inserted and sits flat.
-
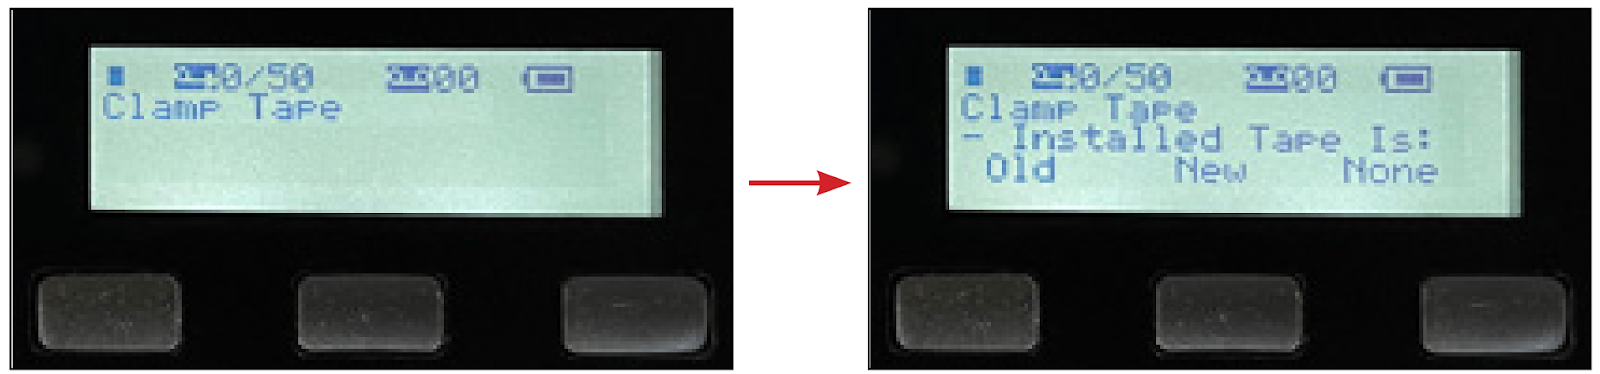
Scroll through the menu options to Clamp Tape.
-
OLD — installing a tape cartridge that has been partially used before: press the left button under the on-screen "Old" option.
-
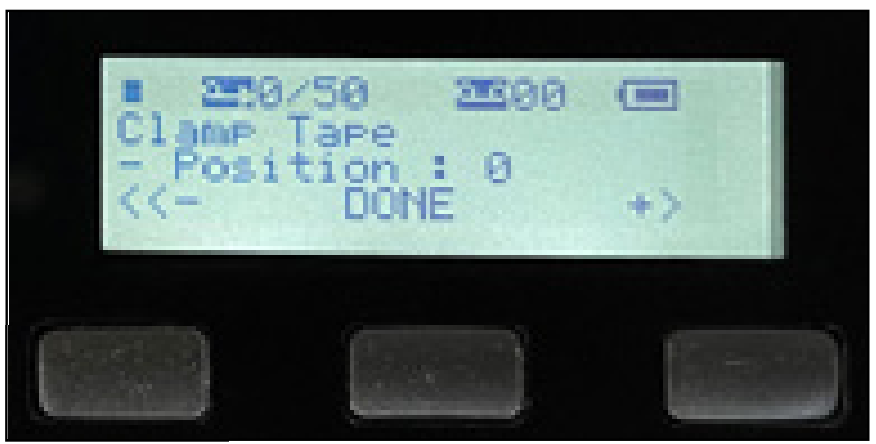
The screen shows "- Position : " and the "<<-", "Done", and "+>" options, where the value is the current tape position of the cartridge being installed.
-
Use the left button (under "<<-") and the right button (under "+>") to decrease or increase the displayed tape position value.
-
When the correct value is shown, press the center button (under "DONE").
-
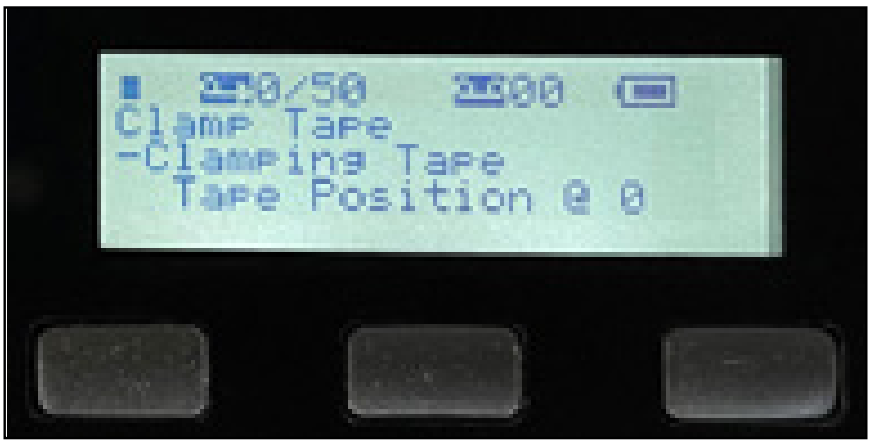
"-Clamping Tape" and "Tape Position @ " appear. The optical head moves to its clamped position and stops in about 6 seconds.
-
-
NEW — installing a tape cartridge that has never been used: press the center button under the on-screen "New" option.
-
"-Clamping Tape" and "Tape Position @ 0" appear, since the cartridge is new. The optical head moves to its clamped position and stops in about 6 seconds.
-
-
NONE — reinstalling the same cartridge that was previously installed (the cartridge was not removed after the clamp was released): press the right button under the on-screen "None" option.
- "-Clamping Tape" and "Tape Position @ " (the previously installed position) appear, since no change was made. The optical head moves to its clamped position and stops in about 6 seconds.
-
-
Confirm that the filter tape cartridge is clamped by the optical head.
-
With the cartridge correctly installed, return the filter tape cartridge door to its closed position and fully tighten the flat-head slotted screw(s). Once the door is closed and locked, the instrument is ready for use. Reset the Node at this point — either unplug the cable from the module and plug it back in, or remove the Node's power cable and reconnect it after a few seconds.
Preventive maintenance and recalibration
Clarity recommends a regular 24-month standard maintenance service schedule to keep the instrument clean and ensure proper operation and calibration.
To start this process, or to get expert help with questions or problems with this instrument, please contact us at support@clarity.io.
What's next
- Deploy your Black Carbon Module.
- Find the right spot with the Black Carbon siting guide.
- View and interpret Black Carbon data.
- Troubleshoot Accessory Module alarms.
Was this article helpful?
Yes, thanks! / Not really
Still need a hand? Email us at support@clarity.io or create a support ticket, and our team will get back to you.